

I'll be honest, I've been putting this off for a long time. I had backups in the loosest sense of the word, but nothing that followed any real methodology. If my server died tomorrow, some stuff would be recoverable and some of it just wouldn't be. That's not a backup strategy, that's a prayer.
So this is part one of a series where I finally do this properly. By the end of this guide you're going to have a real working backup system built around the 3-2-1 principle. Three copies of your data, two different types of media, and one copy offsite. Actually, by the time we're done with the full series we're going to go further than that, all the way to 4-3-2-1. More on that below.
This guide covers part one: building the backup machine, installing Proxmox Backup Server, setting up ZFS, getting Proxmox VE and Docker machines backing up locally, and pushing an offsite copy to S3 compatible cloud storage. Part two will cover restoring, rollbacks, and notifications. Part three is going to be a fun one - we're going to take a second machine offsite to a family member's house and connect it back peer-to-peer with NetBird, giving us an offsite copy we actually control.
What is Proxmox Backup Server?
Proxmox Backup Server (PBS) is a free and open source backup solution that's designed to work natively with Proxmox VE, but do note it works just as well with Unraid, TrueNAS, bare metal Linux, Docker, and just about anything else you're running. The native PVE integration gives you some extra features like live snapshot backups, but it's not a requirement. If you're not running Proxmox at all, you can still back up your Docker machines and Linux servers into it with the PBS client.
What makes PBS worth using over other solutions is how it handles data. It stores backups as chunks and deduplicates across snapshots. So if you back up a 100GB dataset and only 5GB changes overnight, the next snapshot only uploads those 5GB of changes. Restoring is fast, retention management is clean, and the web UI is actually good.
Hardware and the 4-3-2-1 Plan
For hardware, repurposing a desktop or building your own is going to be the most cost-effective route. That said, if you want something compact that you can actually install PBS directly onto as a NAS, I do recommend the UGreen or MiniForum NAS options. Two reasons: they genuinely support the home lab community, and they're one of the few NAS options where you can install PBS bare metal, which you can't do on something like a Synology or QNAP.
For drives, you know your data better than I do. I'm not backing up my media library, just photos, documents, config files, and VM/container data. I ended up going with six 4TB drives in my UGreen NAS with RAID Z2, giving me around 10TB of usable space and the ability to lose two drives without losing any data. At a bare minimum I'd recommend at least two spinning drives so you can mirror them.
The full plan by the end of this series:
- Local backup on PBS (this guide)
- Cloud backup via S3 compatible storage (this guide)
- Offsite backup on a second PBS machine at a family member's house (part three)
That puts us at 4 copies, 3 different media types, 2 offsite. Hence 4-3-2-1.
Installing Proxmox Backup Server
Head over to the Proxmox download page and grab the PBS ISO. Flash it to a USB using GNOME Disks on Linux, Rufus on Windows, or Balena Etcher on macOS. If there's anything on the USB it's going to get wiped, so back it up first.
Plug the USB into your backup machine and boot from it. You'll want at least one NVMe SSD as your boot drive, separate from your backup storage drives.
At the boot screen go ahead and select Graphical Install. From there:
- Accept the EULA
- Select your NVMe SSD as the install target. Do not pick one of your backup drives. If you have a second SSD, you can go to Options here and set up a ZFS mirror for the boot drive, but ext4 on a single SSD is perfectly fine.
- Pick your country and timezone
- Set a strong root password and enter a valid email address
- Configure your network. PBS will usually auto-detect everything. Set a hostname - I went with
ugreen.lanbut use whatever naming convention you prefer. - Review the summary, click Install, and let it do its thing.

When it reboots you'll see the IP and port on screen. Head to https://[your-ip]:8007 in your browser. You'll get an SSL warning since it's a self-signed cert, so go ahead and click through to advanced and proceed. Log in as root with the password you set.
Post-Install Setup
The first thing I do on any fresh PBS install is run the post-install helper script from Proxmox Helper Scripts. This does a few things beyond just updating: it swaps out the enterprise repositories for the free ones and gets rid of the subscription nag popup.

Go to Administration > Shell in the PBS web UI and run:
bash -c "$(wget -qLO - https://github.com/community-scripts/ProxmoxVE/raw/main/misc/post-pbs-install.sh)"
It'll ask you a few questions - say yes to all of them. Once it finishes it'll recommend a reboot, so go ahead and do that.
After rebooting, go ahead and check your time sync. This matters more than you might think because PBS uses timestamps for all its retention scheduling and if your clock drifts, things can get weird.
chronyc tracking
If you see a reference source and an offset in the second or third row, you're good to go. If you need to adjust your NTP servers they live at /etc/chrony/chrony.conf.
Setting Up ZFS Storage
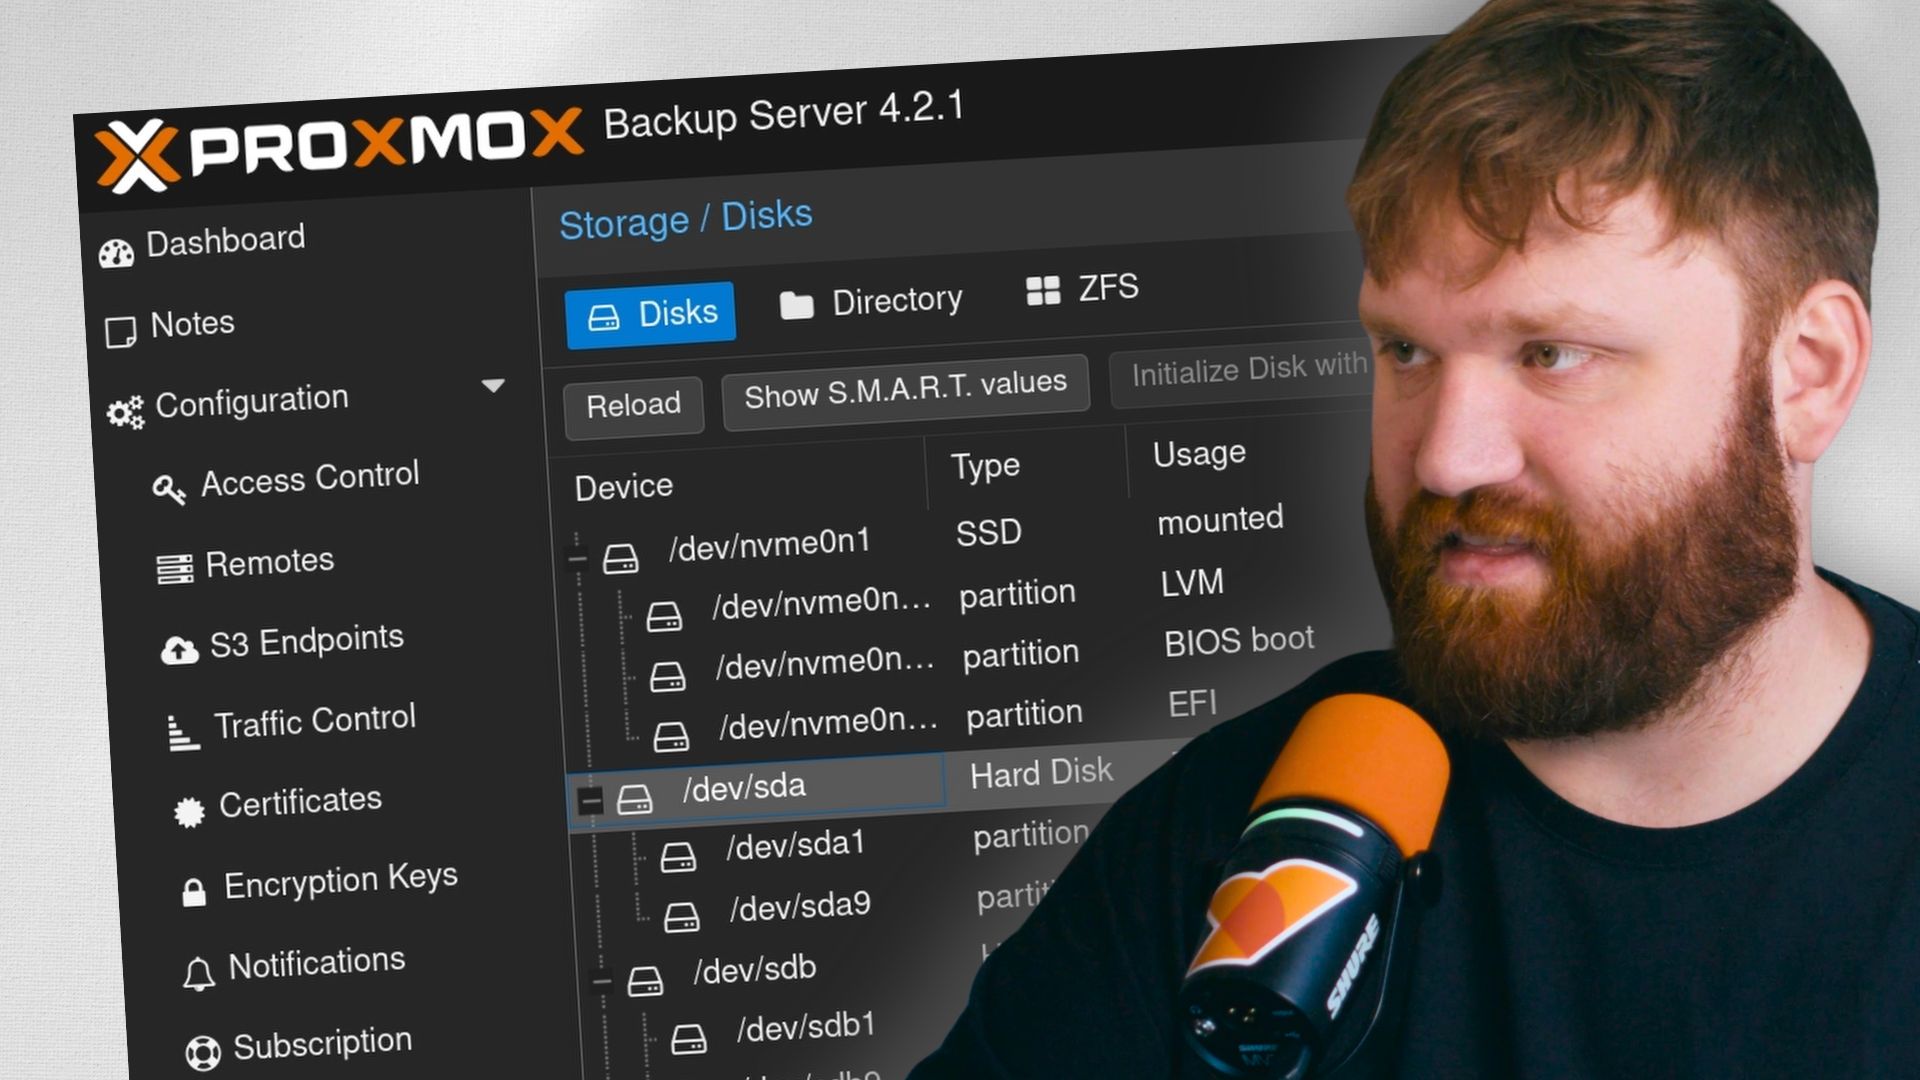
Now for the fun part. Go to Administration > Storage / Disks in the PBS UI. You should see all your drives listed here. The NVMe SSD is your boot drive, leave it alone. Everything else we're going to wipe and build into a ZFS array.
Click each backup drive and hit Wipe Disk. Do this for all of them. It only takes a few seconds per drive.
Once they're wiped, go to ZFS and click Create ZFS. Select all your backup drives. For RAID level, here's the quick breakdown:
- Single - no redundancy, all space usable. Don't do this for backup storage.
- Mirror - exactly two drives, full copy. Simple and reliable for smaller setups.
- RAID Z - one parity drive. If one drive fails you're fine. If two fail, you lose everything.
- RAID Z2 - two parity drives. Can survive two simultaneous drive failures. My recommendation.
- RAID Z3 - three parity drives. For the extra paranoid.

I went with RAID Z2 on six 4TB drives which gives me about 10TB of usable space. The extra 4TB I'm giving up to parity is worth it given that we're storing backups here.
Give your array a name - I called mine vault. Turn compression on, LZ4 is the default and a solid choice. Check Add as Datastore so it gets added automatically. Click Create and give it a minute.
Creating Namespaces
Namespaces are how you organize your backups within a datastore. You technically could dump everything into the root of your datastore, but it gets messy fast. I like to create a separate namespace for each machine or category of backups.
Go to Datastore > vault > Content > Namespaces and create however many you need. For this guide I created:
pve-minisforum- for my Proxmox VE machineunraid-image- for Docker backups from my Unraid machine via PBS client

Make as many as makes sense for your setup. Adding more later is easy.
Setting Up Users and API Tokens
This is important. You don't want to give every machine that connects to PBS your root password. Instead, create a dedicated user and API token for each machine or backup source.
Go to Access Control > User Management and click Add. Give it a username, pick a password (we won't really use it since we're going to use API tokens), keep the realm as pbs and hit Add.
Then go to Access Control > API Tokens and click Add. Select the user you just created, give the token a name like backup, and click Add. Save the token secret somewhere safe right now because it won't be shown again.
Now we need to add permissions for that user and token. Go to Access Control > Permissions and click Add > User Permission. For the path, put:
/datastore/vault/pve-minisforum
Select your user, set the role to DatastoreBackup, and click Add.

Then do the same thing for the API token - Add > API Token Permission, same path, same role.
Go ahead and grab your server fingerprint while you're here. You can either run proxmox-backup-manager cert info | grep Fingerprint in the shell, or go to the Dashboard and click Show Fingerprint. Save that somewhere too, you'll need it when connecting clients.
Backing Up Proxmox VE
If you're running Proxmox VE, this is where the native integration really shines.
Open your PVE web UI and go to Datacenter > Storage > Add > Proxmox Backup Server. Fill it in:
- ID: something like
pbs-vault - Server: your PBS IP address
- Username:
yourusername@pbs!tokenname(note the exclamation mark between user and token name) - Token secret: the API token secret you saved earlier
- Datastore:
vault - Namespace:
pve-minisforum(or whatever you named yours) - Fingerprint: the fingerprint you copied
Click Add and if everything is correct it'll drop in without any errors.

One thing to double check before creating backup jobs: if you have LXC containers with custom mount points, root disks are backed up by default but additional mount points need to be explicitly enabled. Go to your container, click Resources, select the mount point, hit Edit, and check Backup. For VMs, go to Hardware > Hard Disk and make sure the Backup checkbox is enabled.
Now create a backup job under Datacenter > Backup > Add. Set your storage to your PBS datastore, pick a schedule (I go with daily at 9am), set Mode to Snapshot so your containers and VMs stay running during the backup, and under Retention I recommend managing retention on the PBS side so just set this to keep all backups for now.

To verify it works, click Run Now on the job. You should see tasks appear in the PVE task log and data start showing up under your namespace in PBS.
To test the restore, I nuked my AdGuard container. Stopped it, went to More > Remove, confirmed the deletion, and it was gone. Then headed over to PBS, found the backup under Datastore > vault > Content, selected AdGuard, and hit Restore. Assigned it the original container ID, clicked Restore, and just like that it came back. Real nice.

Backing Up Docker with PBS Client
For machines that aren't running Proxmox VE (Unraid, TrueNAS, plain Linux, whatever), you can use the PBS Client Docker image to push backups into PBS from any Docker host. This is a containerized version of the Proxmox backup client that runs on a cron schedule and backs up any directories you mount into it.
First, set up a separate user and API token in PBS for this machine, just like we did above. Create a namespace for it too. Add both the user and token permissions to that namespace path.
Here's an example docker-compose.yml for the PBS client:
services:
  pbs-client-images:
    image: aterfax/pbs-client:latest
    container_name: pbs-client-images
    environment:
      - PBS_ENCRYPTION_PASSWORD=   # Leave blank on first run, grab from logs
      - PBS_ENDPOINT=192.168.1.100:8007
      - PBS_DATASTORE=vault
      - PBS_DATASTORE_NS=unraid-image
      - PBS_API_KEY_NAME=unraid@pbs!unraid-image
      - PBS_API_KEY_SECRET=your-api-key-secret-here
      - PBS_FINGERPRINT=your-fingerprint-here
      - CRON_SCHEDULE=0 3 * * *
      - CRON_BACKUP_ONLY=0
      - TZ=America/Los_Angeles
    volumes:
      - /mnt/user/images:/backups/images:ro
      - /mnt/user/appdata/pbs-client-images:/root/.config/proxmox-backup
    restart: unless-stopped

Do note: leave PBS_ENCRYPTION_PASSWORD blank on the very first run. The container will auto-generate an encryption key and print it to the logs exactly once. You have to grab it before you restart the container. Go to the container logs after first spin-up and look for something like Important new client encryption password. Copy that, then stop the container, paste it into the compose file as PBS_ENCRYPTION_PASSWORD, and bring it back up.

Also make sure each PBS client container has its own config directory. If two containers share the same /root/.config/proxmox-backup bind mount they'll conflict with each other's encryption keys, which is bad.
Saving Your Encryption Keys
This is critical. The data you're pushing to PBS is encrypted by default, and the encryption keys live in the config directory of the PBS client container. If that directory gets wiped and you haven't saved the keys, your backups on PBS are unrecoverable.
Go into the config directory and cat these three files:
cat /path/to/pbs-config/encryption-key.json
cat /path/to/pbs-config/master-public.pem
cat /path/to/pbs-config/master-private.pem

Save all of them somewhere completely separate from the machine being backed up - a password manager like Vaultwarden is perfect for this. You can also print them out if you want to go full paranoid mode, which honestly isn't a bad idea.
Prune and Garbage Collection Jobs
You don't want to keep every backup forever. PBS handles this with two things: prune jobs that mark old snapshots for deletion, and garbage collection jobs that actually remove the data.
Go to Datastore > vault > Prune & GC Jobs and click Add under Prune Jobs. Pick your namespace and set your retention schedule. Mine looks like this:
- Keep last: 3
- Keep daily: 7
- Keep weekly: 4
- Keep monthly: 6
- Keep yearly: 1

One thing worth understanding about how PBS stores data: it's chunk-based and deduplicated. So if you have 1TB on Nextcloud and delete 500GB, that deleted 500GB still lives in your older snapshots until those snapshots get pruned by this job. The storage won't actually free up until the garbage collection job runs after the prune.
For the garbage collection job, click Edit next to GC Schedule and set it to run a couple of hours after your prune job. I set mine to midnight. So prune runs at 11pm, marks things for deletion, and then GC runs at midnight and actually cleans up.
Setting Up Offsite S3 Storage with Mega S4
Now for the offsite component. I'm using Mega S4 for this, which is their S3 compatible object storage. It's privacy-focused, reasonably priced, and straightforward to set up. The steps below will work with any S3 compatible provider - AWS, Backblaze B2, Wasabi, whatever you prefer.
A couple of things worth knowing before you start. Cloud backups are going to be significantly slower than local backups, especially on a home internet connection. Mine took a couple of days to do the initial upload on a 30 megabyte per second upload connection. Also pay attention to your provider's pricing model - some charge per request, and since PBS uploads in small chunks of around 4MB, that can add up fast on a large initial backup.
Creating the Bucket and Access Keys
In your Mega S4 dashboard, create a new bucket. I named mine proxmox-backup-server-offsite. Then go to Keys, create a new access key, name it something like proxmox-backup-server, and download the credentials. Save both the access key and secret key somewhere safe.
Adding the S3 Endpoint in PBS
In PBS, go to Configuration > S3 Storage and click Add. Give it a name like mega-s4. Drop in your access key and secret key.

For the endpoint, go back to your Mega S4 dashboard and navigate to Object Storage > Settings. You'll see a list of regional S3 compatible endpoints. Pick the one closest to you and paste it into PBS.

Two important things here:
- Check Path Style or you'll get errors when trying to connect
- Leave fingerprint blank
Click Add and then run these two quick verification commands in the PBS shell to make sure everything is wired up correctly:
proxmox-backup-manager remote info mega-s4
proxmox-backup-manager remote list-buckets mega-s4
No output from the first command means no errors. The second should list your bucket. If you see it, you're good to go.
Creating the S3 Cache Directory
PBS needs a local cache on an SSD to stage chunks before uploading to S3. Do not put this on a spinning disk or a network share. Run these commands in the PBS shell:
mkdir -p /var/cache/proxmox-backup-server-s3
chown -R backup:backup /var/cache/proxmox-backup-server-s3
More cache space means better performance. I have around 100GB allocated here which works fine for my setup, but more is always better.
Creating the S3 Datastore
Go to Datastore > Add Datastore. Set the type to S3. For the absolute path, put /var/cache/proxmox-backup-server-s3. Give it a name like pbs-offsite, select your Mega S4 endpoint, and your bucket should auto-populate.

While you're here, set up your prune options to match what you set on the local datastore, then click Add.
Setting Up the Sync Job
The offsite datastore is going to pull from your local vault rather than having each client push to it directly. This way the cloud upload happens on a schedule and doesn't interfere with your backup windows.
Go to your offsite datastore, click Sync Jobs, and add a new one. Set it as a Pull Job, source as local, data source as vault. You can sync specific namespaces or all of them - I sync everything to the single bucket.
For the schedule, make sure you set it to run after your local backups have completed. My local backups run at 9am, so I set the sync job to run at 2:30am. Anything backing up in the wee hours has already finished long before the sync kicks off.
Click Add and the job will appear. You can click Run Now to kick off the first sync manually. It's going to take a while for the initial upload. Check the task log and then head over to your Mega S4 dashboard and you should start seeing chunks appearing in your bucket.

Wrapping Up
So there we go. From a machine with no backup strategy to a real 3-2-1 system with local redundancy, deduplication, and an encrypted offsite copy in the cloud. Part two is going to cover the other side of all this: restoring individual files, doing full rollbacks, and setting up notifications so you actually know when something fails. That last one is more important than it sounds.
Links to everything mentioned in this guide are below. Do make sure you subscribe so you don't miss parts two and three, because part three with the offsite NetBird peer-to-peer setup is going to be a real good one.