

NetBird is an open source zero-trust networking platform that lets you create secure private networks to connect directly to your home servers using the WireGuard protocol. Recently NetBird has massively improved the self-hosting experience, and a single script now handles pretty much everything for you. This includes automatically setting up Traefik as a reverse proxy with automatic TLS and letting you use local users right out of the box. For my setup I like to use an external IdP for added security, and we're going to use the new built-in reverse proxy feature to expose Pocket ID without needing a separate proxy stack.
While I could self-host this on my own hardware at home I prefer to use a VPS in the cloud. That way I don't need to open any ports at home and if my home internet goes down (happens quite a bit) I don't lose access to other resources that are not hosted on my home servers.
Prerequisites
Most VPS services will work great. I'm currently using Hostinger with their KVM 2 (referral link) as they have been a sponsor in the past and it's a good value. This needs to be a Linux VM with at least 1 CPU and 2GB of memory that is publicly accessible on TCP ports 80 and 443, and UDP port 3478.
Next you'll need a public domain pointing to the VPS IP address you'll be installing NetBird on. We need two DNS entries for this setup. I use Cloudflare to manage my domains. Do note that all of these need to be set to "DNS only" in Cloudflare, not proxied. To learn more checkout our guide on setting up a proxy for external access and local top-level domains.
| Type | Name | Content | Proxy Status |
|---|---|---|---|
| A | netbird | YOUR.SERVER.IP.ADDRESS | DNS only |
| CNAME | *.netbird | netbird.example.com | DNS only |
The A record is for the NetBird management dashboard. The wildcard CNAME record ensures that all service subdomains (e.g., auth.netbird.example.com) resolve to your server. This is what the built-in reverse proxy feature uses to expose services like Pocket ID.
On the VPS create a local user with sudo privileges adduser brandon then adduser brandon sudo replacing brandon with your name and switch to that user with su brandon. Additionally, you will need to make sure you have a few packages and Docker setup. Update your system then install curl and jq. Then use the commands below to setup Docker on your system.
curl -fsSL https://get.docker.com -o get-docker.sh
sudo sh get-docker.sh
sudo usermod -aG docker $USER
newgrp docker
NetBird Setup
Pretty simple here. Create a directory and run the install script:
cd ~
mkdir netbird
cd netbird
curl -fsSL https://github.com/netbirdio/netbird/releases/latest/download/getting-started.sh | bash
The script will prompt you to enter your domain name for NetBird. Type in your full domain like https://netbird.example.com and then you'll see the reverse proxy selection:
Which reverse proxy will you use?
  [0] Traefik (recommended - automatic TLS, included in Docker Compose)
  [1] Existing Traefik (labels for external Traefik instance)
  [2] Nginx (generates config template)
  [3] Nginx Proxy Manager (generates config + instructions)
  [4] External Caddy (generates Caddyfile snippet)
  [5] Other/Manual (displays setup documentation)

Enter choice [0-5] (default: 0):
Just press Enter to use the default option [0] Traefik. This is the recommended option and it handles TLS certificates automatically via Let's Encrypt. No extra configuration needed. Beautiful.
Enable the Reverse Proxy Feature
Right after that, the script will ask if you want to enable the NetBird Proxy service:
Do you want to enable the NetBird Proxy service?
The proxy exposes internal NetBird network resources to the internet.
Enable proxy? [y/N]: y
Go ahead and type y here. This is the new built-in reverse proxy feature that we're going to use to expose Pocket ID (and anything else you want to make publicly accessible through your NetBird network).
The script will automatically generate a proxy access token, create a proxy.env configuration file, and start all the containers. It uses your management domain with the wildcard DNS record (e.g., *.netbird.example.com) so service subdomains resolve correctly.
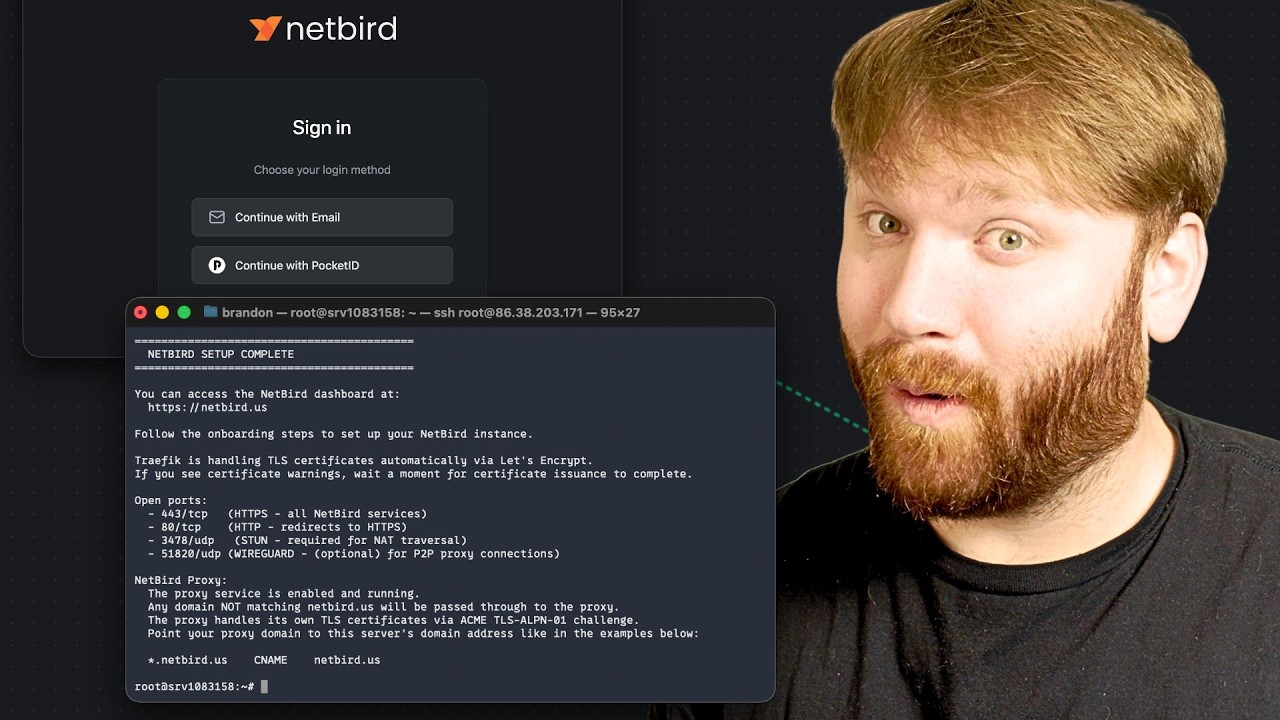
And there we go. NetBird is up and running with Traefik handling TLS and the reverse proxy feature ready to go.
Onboarding / Local User
When you first access the NetBird dashboard at https://netbird.example.com, you'll be redirected to the setup page. This uses NetBird's built-in identity provider (powered by an embedded Dex server) which is perfect for getting started.
- Click "Create Account" and enter your email, name, and a strong password
- Verify your email if prompted
- You'll be logged into the NetBird dashboard
The /setup page is only accessible when no users exist. After creating the first user it redirects to the regular login page.
Setting Up Pocket ID
Pocket ID is a lightweight, self-hosted OpenID Connect (OIDC) identity provider with passkey support. It's perfect for securing your NetBird installation with modern passwordless authentication. The cool thing here is we're going to run a NetBird client alongside Pocket ID on a shared Docker network with static IPs. The NetBird client will act as a routing peer, which means it can expose anything on that Docker subnet to your NetBird network. So if you add more services to this stack later, the same NetBird client can route traffic to all of them. Then we'll use NetBird's built-in reverse proxy to make Pocket ID publicly accessible. No separate proxy stack needed.
First, create a setup key in the NetBird dashboard. Navigate to Setup Keys > Add Setup Key, give it a name like "VPS Services", and create the key. Copy it because you'll need it in a moment. Since this client will be a routing peer for potentially multiple services, a more general name makes sense here.
Now on your VPS, create a directory for Pocket ID:
cd ~
mkdir services
cd services
Generate Encryption Key
Pocket ID requires an encryption key to secure sensitive data. Generate one and store it in a file:
mkdir -p pocket-id/key
openssl rand -base64 32 > pocket-id/key/encryption_key
chmod 644 pocket-id/key/encryption_key
Running Pocket ID with the NetBird Client
We're creating a Docker network with a defined subnet and assigning static IPs to each container. This way Pocket ID always lives at the same address on the network, and the NetBird client knows exactly where to route traffic. If you add more services to this stack later, you just give them a static IP on the same network and the NetBird client can reach them all.
Create the compose file:
nano compose.yaml
Paste in the following:
services:
  pocket-id:
    image: ghcr.io/pocket-id/pocket-id:v2
    container_name: pocket-id
    restart: unless-stopped
    environment:
      - APP_URL=https://auth.netbird.example.com
      - ENCRYPTION_KEY_FILE=/key/encryption_key
      - TRUST_PROXY=true
    volumes:
      - "./pocket-id/data:/app/data"
      - "./pocket-id/key:/key"
    networks:
      services:
        ipv4_address: 172.28.10.10
    healthcheck:
      test: ["CMD", "/app/pocket-id", "healthcheck"]
      interval: 1m30s
      timeout: 5s
      retries: 2
      start_period: 10s

  netbird:
    image: netbirdio/netbird:latest
    container_name: netbird-client
    restart: unless-stopped
    cap_add:
      - NET_ADMIN
      - SYS_ADMIN
      - SYS_RESOURCE
    environment:
      - NB_SETUP_KEY=
      - NB_MANAGEMENT_URL=https://netbird.example.com
      - NB_HOSTNAME=vps-services
    volumes:
      - ./netbird:/var/lib/netbird
    networks:
      services:
        ipv4_address: 172.28.10.2

networks:
  services:
    name: services
    driver: bridge
    ipam:
      config:
        - subnet: 172.28.10.0/24
          gateway: 172.28.10.1
Replace <YOUR_SETUP_KEY> with the setup key you created in the NetBird dashboard and update the domains to match your setup. Pocket ID sits at 172.28.10.10 and the NetBird client at 172.28.10.2 on the 172.28.10.0/24 subnet. If you add more services later, just assign them an IP in this same range (like 172.28.10.11, 172.28.10.12, so on and so forth).
Save the file and spin up the service:
docker compose up -d
Give it a moment and you should see the "vps-services" peer show up in your NetBird dashboard under Peers. Super cool.
Set Up the Network and Routing Peer
Now we need to tell NetBird that the vps-services peer can route traffic to the Docker subnet. This is what lets the reverse proxy actually reach Pocket ID.
- In the NetBird dashboard, navigate to Networks > Add Network
- Give it a name like "VPS Docker Services"
- Add a network resource with the Docker subnet
172.28.10.0/24 - Assign the vps-services peer as the routing peer
- Create or update a policy to allow traffic to this network
Once that's saved, any service on the 172.28.10.0/24 subnet is reachable through the NetBird network via the routing peer. This is the foundation that makes the reverse proxy work for Pocket ID, and for anything else you add to this Docker network later.
Expose Pocket ID with NetBird Reverse Proxy
Now here's the really nice part. Instead of setting up a whole separate reverse proxy stack to make Pocket ID accessible from the internet, we're going to use NetBird's built-in reverse proxy feature. Since we already have a routing peer that can reach Pocket ID's static IP, we just point the reverse proxy at it.
- In the NetBird dashboard, navigate to Reverse Proxy > Services and click Add Service
- Enter a subdomain like
authand select your domain (netbird.example.com), so the full URL will beauth.netbird.example.com - Click Add Target, select the network resource for the Docker subnet, enter Pocket ID's static IP
172.28.10.10, set the protocol to HTTP and the port to 1411 (Pocket ID's default port) - Under the Authentication tab, leave all methods disabled since Pocket ID handles its own authentication
- Click Add Service
NetBird will provision a TLS certificate and establish the tunnel. Wait for the status to show "active" and then navigate to https://auth.netbird.example.com. And just like that, Pocket ID is publicly accessible with TLS, traffic flows through an encrypted WireGuard tunnel to the routing peer, which forwards it to Pocket ID on the Docker network. No Nginx, no Caddy, no separate proxy stack. Would you look at that.
Note: If you want to use a custom domain like
auth.example.cominstead, you can set that up under the Custom Domains section. Just add a CNAME record pointing to your proxy cluster and NetBird handles the rest. Check out the custom domains documentation for details.
Complete the initial Pocket ID setup by navigating to https://auth.netbird.example.com/setup, creating your admin account, and registering a passkey.
Adding more services later: Because the NetBird client is a routing peer for the entire
172.28.10.0/24subnet, you can add any other containerized service to this same Docker network with a static IP and immediately expose it through the reverse proxy. Just add another target in the dashboard pointing to the new container's IP and port. One NetBird client, one network, as many services as you need.
Add Pocket ID to NetBird
The NetBird documentation walks through these steps in detail, but here's the quick version:
- In Pocket ID, go to Administration > OIDC Clients and click Add
- Set the name to "NetBird", keep Public Client and PKCE off, and save
- Note the Client ID and Client Secret
- In the NetBird dashboard, go to Settings > Identity Providers > Add Identity Provider
- Select Pocket ID as the type, paste in your Client ID, Client Secret, and set the Issuer to
https://auth.netbird.example.com(no trailing slash) - Save, then copy the Redirect URL that NetBird gives you
- Back in Pocket ID, edit your NetBird OIDC client and add the redirect URL to Callback URLs
- Create a User Group called "NetBird" in Pocket ID, add your users to it, and assign the group to the OIDC client
Log out and you should see a Pocket ID button on the NetBird login page. Test the login to make sure everything works.
NetBird Continued
Remove NetBird Local User
Once Pocket ID is configured and working, you may want to disable the local user authentication to enforce all logins through your IdP.
- Log into NetBird using your Pocket ID credentials to verify it works
- In the NetBird dashboard, go to Users and change ownership to the Pocket ID user
- Remove any local user accounts that were created during initial setup
Warning: Make sure you can successfully authenticate via Pocket ID before disabling local users, or you may lock yourself out of the dashboard.
Adding a Peer
To connect a device to your NetBird network:
- In the dashboard, navigate to Peers > Add Peer
- Copy the setup key or use the one-liner install command provided
- On your device, install the NetBird client:
curl -fsSL https://pkgs.netbird.io/install.sh | sh
- Connect using the setup key:
sudo netbird up --management-url https://netbird.example.com --setup-key
Your device should now appear in the Peers list with a NetBird IP assigned.
Creating a Network
Networks in NetBird allow you to expose resources to your peers without installing the NetBird client on every machine.
- Navigate to Networks > Add Network
- Give it a descriptive name (e.g., "Home Lab")
- Add a network resource by specifying the IP range or specific hosts you want to expose (e.g.,
192.168.1.0/24for your home network) - Assign a routing peer, this is a device that has access to the target network and will route traffic for other peers
- Create a policy to control which peers can access this network
This is incredibly useful for accessing your entire home network through a single peer running NetBird.
Wrapping Up
You now have a fully self-hosted NetBird setup with Traefik handling TLS, Pocket ID providing passwordless authentication, and the new built-in reverse proxy exposing it all without needing a separate proxy stack like Nginx Proxy Manager. The whole thing runs through encrypted WireGuard tunnels and you have full control over your infrastructure. No third-party dependencies for your traffic, no MITM, no wondering what someone else is doing with your data. It's just nice.
If you want to see how I use NetBird for remote access to services like Immich, checkout our Immich self-hosting guide. With all that, I do hope you found this helpful. Have a great one.